Star Photography can yield some amazing results, but one of the most common predicaments photographers find themselves in, is getting the correct settings to capture the image the way they want. Many of the high end pros that specialize in this field of photography have an arsenal of pristine and very expensive optics at their disposal. Unfortunately, this isn’t an option for a lot of people. I’m going to show you how you can capture the night sky with a basic SLR body and a kit lens.
Firstly we should cover the two main areas of photographing stars and the night sky.
1) Frozen/Still – This is when you typically use a faster shutter speed, and wider aperture to ‘freeze’ the sky. This prevents the stars from moving and creating trails.
2) Star Trails – To capture star trails, you will want to stop your aperture right down, and use a lower ISO but much, much longer shutter speed. This is will give you long, bright star trails as the earth rotates. Often, photographers will set their cameras to focus around the North Star. This will give you star trails that wrap around your scene rather than coming across it from any given direction.
Things you should consider before heading out to find your location:
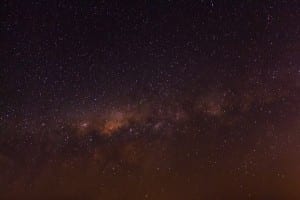
- Scout a location that is away from light sources. Ambient light coming from cities, street lights, stadiums etc. will wash away most of the stars and you’ll be left with a blown out photo. For my example, I went to the top of Mt. Tamborine. The only lights I had to deal with were the cars driving past with their headlights on.
- Clear Skies – If you go on a cloudy evening, depending on wind speed – this can potential ruin your photo as it will blur across the scene as your shutter is open. Clear, bright skies often work best for this.
- Bug Spray – I can’t comment on other parts of the world, but here in Sunny Queensland, the mosquitoes love feasting on photographers exposed limbs. I learnt the hard way!
What you’ll need to bring:
- Tripod – Absolutely essential. Any tripod will do, but if you have a thicker, sturdier tripod – this will help negate any shaking caused by wind. I used a Manfrotto tripod and it works quite well.
- Camera – Obviously! I used a Canon 650D in this shot.
- Lens – If you want to freeze the sky, you’ll want a lens with a fairly wide aperture. For this image, I used the Canon EF-S kit lens. 18-135mm f/3.5-5.6
- Remote Trigger – This comes in handy, but not essential. If you do not have one of these, you can set your camera to a 5 second timer and take your shot that way.
Once you have found your location and you have set up all your equipment, it’s time to start shooting. Don’t be afraid to experiment with different settings, you might be pleasantly surprised. Firstly, I always like to shoot in RAW – this gives you ultimate control over your photo when you bring it into Adobe Lightroom or any other editing application you might use.
Set your camera to M ‘Manual Mode’. Having the camera set to manual will give you full control over all parameters on the camera. ISO, Aperture, Shutter Speed etc. You will typically want to set your lens to manual focus, and set it to infinity. The symbol on the focus dial looks like a sideways ‘8’. For this example, I’ll be telling you how to recreate the shot I took above, so lets go ahead and set your ISO to something fairly high like 800. You will have some noise, but we can deal with this in Lightroom later on.
Set your focal length to the widest it goes, on the kit lens, it’s 18mm. On an APS-C Crop sensor like the 650D, this equates to about 29mm. Now we will set the aperture. I set mine to f/3.5 which is the widest I can use for the 18-135mm. For the shutter speed, you will want to set it to Bulb. To set this, keep scrolling the wheel (or dial depending on camera) past 30 seconds until you get to ‘bulb’. To use bulb mode, you will need to press the shutter button once to start capturing the image, and press it again to finish and process the image. This is why a remote typically works better so you don’t have to touch the camera itself.
On these settings, with a fairly clear evening and very low light conditions, you’ll probably want to expose the image for 20-25 seconds. If the image is too dark, you can either a) bump up the ISO b) widen your aperture (if the lens you’re using allows it) or c) expose the image longer. If you expose for too long though, you will start to get trails behind the stars in the sky. If the image is too bright, bring down the ISO, or use a shorter exposure time.
Other helpful tips
- Image Stablization – If you are using a lens with IS, turn it off. You don’t need it on a tripod (unless it’s very windy) It will save you battery power.
- Lens Hoods – This will help keep any unwanted ambient light out. In my situation, cars driving past with headlights. If you don’t have a lens hood, you can cup your hands around the lens, or use something like a jumper or shirt to block light from those directions.
I hope this helps you start capturing the night sky, these are merely guidelines that I use but there is no right or wrong way to take photos – experiment and have fun!


